Safety Guidelines
- Always read the manual before operating the snow thrower to ensure safe usage․
- Wear protective gear, including gloves and safety goggles, during operation․
- Keep children and pets away from the machine while in use․
- Ensure all safety guards and protective devices are properly attached․
- Never operate the snow thrower without proper guards in place․
1․1 Essential Safety Precautions
- Always read the manual thoroughly before operating the Craftsman 24-inch snow thrower to understand safety rules and proper usage․
- Wear appropriate protective gear, including gloves, safety goggles, and sturdy footwear, to minimize injury risks․
- Ensure the area is clear of obstacles, children, and pets before starting the machine․
- Never operate the snow thrower without all safety guards and protective devices properly in place․
- Keep loose clothing and long hair tied back to avoid entanglement with moving parts․
- Disconnect the ignition key and ensure the machine is completely stopped before performing maintenance or repairs․
- Avoid operating the snow thrower in extreme weather conditions or when visibility is poor․
- Never touch hot or moving parts, and keep hands and feet away from the auger and impeller․
1․2 Safety Symbols and Their Meanings
The manual includes several safety symbols to alert users of potential hazards․ A warning symbol, often a triangle with an exclamation mark, indicates actions that could cause injury or damage․ A caution symbol highlights important operating instructions․ Other symbols, such as a hand or fire, may signify specific risks like hot surfaces or flammable materials․ Understanding these symbols is crucial for safe operation․ They are standardized to ensure quick recognition and compliance with safety guidelines․ Always refer to the manual for detailed explanations of each symbol to minimize risks while using the Craftsman 24-inch snow thrower․
Assembly Instructions
Begin by unpacking and inventorying all parts․ Follow the step-by-step guide to attach the handle, align the auger, and install the drive belt․
Refer to the manual for specific torque specifications and assembly diagrams to ensure proper installation of each component․
2․1 Unpacking and Inventory
Begin by carefully unpacking the snow thrower and all accessories from the box․ Inspect for damage during shipping․ Use the inventory list provided in the manual to ensure all parts are included․ Key components include the auger, impeller, handlebars, and ignition key․ Organize the hardware, such as bolts and screws, and match them to the parts list․ Refer to the assembly diagram to familiarize yourself with the layout․ Check for any additional items like the owner’s manual, safety decals, and warranty information․ If any parts are missing or damaged, contact customer support immediately before proceeding․ This step ensures a smooth assembly process․
2․2 Step-by-Step Assembly Process
Start by attaching the handlebars using the provided bolts, ensuring they are securely tightened․ Next, install the auger and impeller according to the manual’s instructions․ Align the drive belt with the engine pulley and gently slide it into place․ Refer to the diagram for proper routing․ Tighten all connections firmly to avoid vibration during operation․ Finally, check that all components are properly aligned and secured․ Double-check the assembly against the manual’s guidelines to ensure everything is correctly installed before first use․ Proper assembly is crucial for optimal performance and safety․

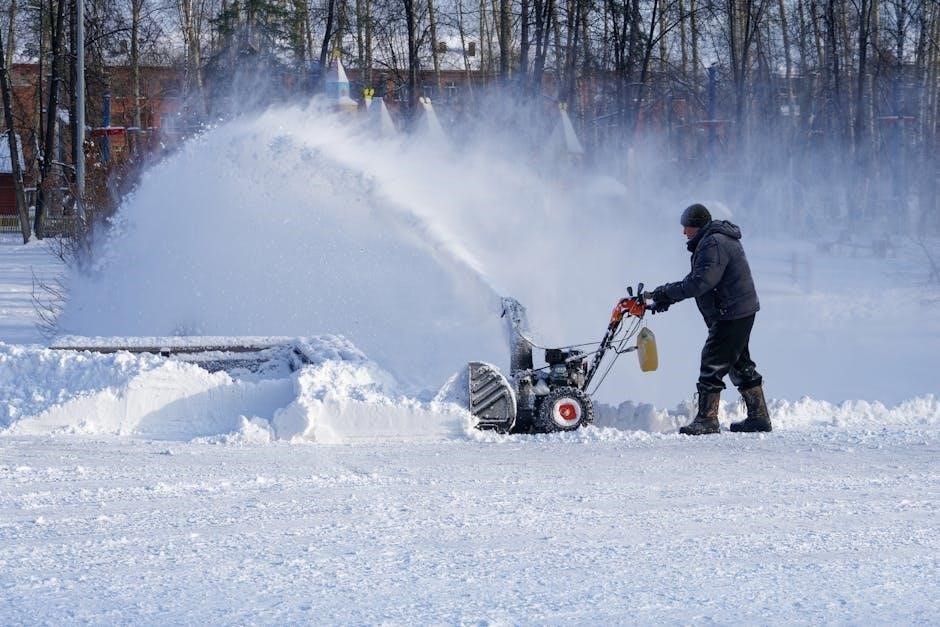
Operating the Snow Thrower
Start the engine using the recoil or electric start feature․ Adjust the choke and throttle for optimal performance․ Engage the auger and direct snowflow as needed․ Ensure proper handling for safety and effectiveness․
3․1 Starting the Engine
To start the engine, ensure the auger is disengaged for safety․ For recoil start, pull the starter handle slowly until resistance is felt, then pull sharply․ For electric start, insert the key, press the ignition button, or turn the key clockwise․ Ensure the choke is in the correct position for cold starts․ Prime the engine by pressing the primer bulb 2-3 times if equipped․ Avoid pulling the starter cord more than 5 times in a row to prevent damage; Always operate in a well-ventilated area to avoid carbon monoxide exposure․
3․2 Using the Electric Start Feature
To use the electric start feature on your Craftsman 24-inch snow thrower, ensure the auger is disengaged for safety․ Insert the ignition key into the key switch and press the ignition button or turn the key clockwise to start the engine․ The electric start eliminates the need for pull-starting, making it easier to start the engine, especially in cold weather․ Always ensure the area is well-ventilated to avoid carbon monoxide buildup․ If the engine does not start, check the choke position and ensure the primer bulb has been pressed the recommended number of times․ This feature provides a convenient and efficient way to power up your snow thrower․

Maintenance and Care
- Regularly check and maintain the recommended oil level in the engine․
- Lubricate moving parts, such as the auger and impeller, to ensure smooth operation․
- Inspect and replace belts and spark plugs as specified in the manual․
- Store the snow thrower in a dry, well-ventilated area after cleaning․
4․1 Regular Maintenance Schedule
Regular maintenance is crucial for optimal performance and longevity of your Craftsman 24-inch snow thrower․ Follow this schedule:
- Check engine oil levels before each use and top up as needed․
- Inspect and replace the spark plug annually or as specified in the manual․
- Lubricate moving parts, such as the auger and impeller, every 10 hours of operation․
- Examine belts for wear and tear; replace them if cracked or frayed;
- Clean the machine thoroughly after each use to prevent rust and corrosion․
- Store the snow thrower in a dry, well-ventilated area during the off-season․
Refer to the manual for detailed instructions and specific intervals for maintenance tasks․
4․2 Lubrication and Tune-Up
Regular lubrication ensures smooth operation and extends the life of your Craftsman 24-inch snow thrower․ Lubricate the auger, impeller, and gear shafts with a high-quality grease recommended in the manual․ Sharpen the auger blades annually to maintain efficiency․ Inspect and tighten all bolts and screws periodically․ Replace worn or damaged belts and pulleys to prevent unexpected breakdowns․ Perform a pre-season tune-up, including spark plug replacement and fuel system cleaning․ Always follow the manufacturer’s instructions for lubrication and tune-up procedures to ensure optimal performance and warranty compliance․

Troubleshooting Common Issues
- Engine not starting? Check fuel levels, spark plug, and air filter․ Ensure the choke is properly adjusted․
- Auger not turning? Inspect the belt for wear or damage and ensure all shear pins are intact․
5․1 Engine Not Starting
If the engine fails to start, check the fuel level and ensure it’s fresh and correctly mixed․ Verify the spark plug is clean and properly gapped․ Inspect the air filter for blockages and clean or replace it if necessary․ Ensure the choke is in the correct position for starting․ If issues persist, consult the troubleshooting guide or contact customer support․ Always refer to the manual for specific diagnostic steps to avoid further complications․ Proper maintenance and regular checks can prevent such issues․ Follow the recommended procedures to ensure safe and effective operation․
5․2 Auger or Impeller Problems
If the auger or impeller is not functioning properly, stop the engine and ensure all moving parts have stopped․ Check for blockages, such as snow or debris, and clear them carefully․ Inspect for damage or wear on the auger or impeller blades․ If damaged, replace the parts immediately to avoid further issues․ Regular lubrication and maintenance can help prevent such problems․ Refer to the manual for specific instructions on disassembly and replacement․ Always follow safety guidelines when performing repairs to ensure your safety and the machine’s proper operation․ Consult the troubleshooting guide for additional solutions․

Warranty Information
Craftsman offers a two-year warranty covering defects in material and workmanship․ Sears will repair or replace faulty parts free of charge if maintained properly as per the manual․
6․1 Two-Year Warranty Details
The Craftsman 24-inch snow thrower is covered by a two-year warranty starting from the purchase date․ This warranty applies to defects in material and workmanship․ Sears will repair or replace defective parts free of charge during this period․ The warranty is valid only if the snow thrower is maintained, lubricated, and tuned up according to the instructions outlined in the owner’s manual․ Proper maintenance ensures optimal performance and warranty coverage․ Regular upkeep and adherence to manual guidelines are essential to uphold the warranty terms effectively․
6․2 Conditions for Warranty Coverage
The warranty coverage for the Craftsman 24-inch snow thrower requires adherence to specific conditions․ Proper maintenance, lubrication, and tune-ups must be performed as outlined in the owner’s manual․ Repairs must be carried out by authorized Sears service centers to maintain warranty validity․ The owner is responsible for paying for parts and labor not covered under the warranty․ Damage caused by misuse, neglect, or failure to follow manual instructions may void the warranty․ Regular inspections and timely addressing of issues ensure compliance with warranty terms and optimal performance of the snow thrower․

Parts List and Diagrams
The manual includes a detailed parts list and diagrams to help identify key components․ Refer to these resources for ordering replacement parts or troubleshooting issues․
7․1 Identifying Key Components
The manual provides a detailed parts list and diagrams to help users identify key components of the Craftsman 24-inch snow thrower․ These include the auger, impeller, engine, and chute․ Refer to the diagrams to locate components like the auger belt, drive system, and control levers․ The parts list is organized by model number, making it easier to find specific parts․ Use the illustrations to understand how components are assembled and function together․ This section is essential for maintenance, repairs, and ordering replacement parts accurately․
7․2 Ordering Replacement Parts
To order replacement parts for your Craftsman 24-inch snow thrower, refer to the detailed parts list and diagrams provided in the manual․ Ensure you have the correct model number, such as 247․881731 or 247․889571, to identify the specific parts needed․ Use the parts list to locate items like auger belts, impeller blades, or chute components․ Visit the Craftsman website or authorized retailers like Sears PartsDirect to purchase genuine parts․ Double-check your model number before placing an order to ensure compatibility․ The manual also provides guidance on how to locate and order replacement parts efficiently․
Additional Resources
Access the Craftsman 24-inch snow thrower manual online for PDF downloads․ Visit Craftsman’s official website or authorized service centers for customer support and additional resources․
8․1 Online Manual and PDF Downloads
The Craftsman 24-inch snow thrower manual is available for free download on the official Craftsman website․ Users can access the PDF version, which includes detailed instructions for assembly, operation, and maintenance․ The manual covers essential safety guidelines, troubleshooting tips, and warranty information․ Additional resources, such as parts lists and diagrams, are also provided to help users identify and order replacement parts․ Downloading the manual ensures you have all the necessary information to operate and maintain your snow thrower efficiently․
8․2 Customer Support and Service Centers
For assistance with your Craftsman 24-inch snow thrower, contact customer support through the official website or visit authorized service centers․ Trained professionals are available to address questions, repairs, and maintenance needs․ Additionally, Sears service centers provide repair services under the two-year warranty program․ Ensure to have your model number ready for efficient support․ Visit the Craftsman website for a list of nearby service centers and contact information to resolve any issues promptly and effectively․