Mouthpiece boiling is a common procedure for sterilization and shaping. It involves submerging the device in boiling water to ensure hygiene and proper fit. This method is widely used in medical and dental fields to customize mouthguards and ensure safety. Always follow guidelines to achieve optimal results and maintain durability.
Importance of Boiling a Mouthpiece
Boiling a mouthpiece is a critical step for ensuring hygiene, comfort, and proper fit. It sterilizes the device, removing bacteria and germs, which is essential for maintaining oral health. Additionally, boiling softens the material, allowing it to conform to the user’s mouth shape, providing a customized fit. This process is particularly important for dental appliances, mouthguards, and respiratory devices. Proper boiling ensures the mouthpiece is free from contaminants and ready for safe use. It also helps extend the lifespan of the device by removing residue and preventing odor buildup. Always follow specific guidelines to avoid damaging the material. Boiling is a simple yet effective method to guarantee both safety and performance of the mouthpiece.
Safety Precautions
When boiling a mouthpiece, ensure the water is not excessively hot to prevent burns. Always follow the manufacturer’s instructions to avoid damaging the device. Be cautious with boiling times, as overheating can alter the mouthpiece’s shape or functionality. Proper safety measures ensure both effectiveness and longevity of the mouthpiece.
Essential Safety Tips Before Boiling
Before boiling your mouthpiece, ensure you follow these critical safety guidelines. Always review the manufacturer’s instructions to confirm the device is heat-resistant and suitable for boiling. Avoid overheating, as it may damage the mouthpiece or cause it to lose its shape. Never boil parts that are not designed for high temperatures, such as medication chambers or masks. Use protective gloves or tongs to handle the mouthpiece to prevent burns from hot water. Ensure the water reaches a rolling boil before submerging the device. Additionally, avoid leaving the mouthpiece in boiling water for longer than recommended, typically between 30 to 60 seconds. Let the water stand for 30 seconds after boiling to prevent excessive heat. Always test the water temperature with a thermometer if possible, and handle the mouthpiece carefully after boiling to avoid injury.

Preparation for Boiling
Gather a pot, water, and tongs. Ensure the mouthpiece is clean and free of debris. Fill the pot with enough water to submerge the device fully. Bring the water to a rolling boil before proceeding.
Materials Needed for the Process
Essential materials include a clean pot, water, a heat source, and tongs or a slotted spoon for safe handling. A timer is recommended to monitor boiling time accurately. Ensure the pot is large enough to fully submerge the mouthpiece. Additionally, a bowl of cool water may be needed for post-boiling steps. Always use distilled or clean water to prevent contamination. If shaping the mouthpiece, prepare a clean, dry surface and have a towel ready for handling. Following the manufacturer’s guidelines, avoid using metal utensils that could damage the mouthpiece. Proper tools and preparation ensure a safe and effective boiling process.
Cleaning the Mouthpiece Before Boiling
Cleaning the mouthpiece before boiling is crucial for effective sterilization and proper fit. Start by rinsing the mouthpiece under warm water to remove loose debris. Use a soft-bristle toothbrush to gently scrub away any residue or bacteria. For tougher stains, mix a mild detergent with warm water and soak the mouthpiece for 10-15 minutes. Avoid using harsh chemicals, abrasive cleaners, or hot water, as they may damage the material. After soaking, rinse thoroughly with clean water to remove any soap residue. Pat the mouthpiece dry with a clean towel and inspect for any remaining impurities. If autoclaving is recommended, follow the manufacturer’s instructions carefully. Proper cleaning ensures the boiling process is effective and maintains the mouthpiece’s integrity. Always prioritize hygiene to prevent contamination and extend the lifespan of the device.
Checking Manufacturer Instructions
Before boiling a mouthpiece, it is essential to consult the manufacturer’s instructions to ensure proper preparation and safety. Different materials may require specific boiling times or methods, and failing to follow guidelines can damage the device or void the warranty. Some mouthpieces may not be suitable for boiling, while others may require special precautions, such as avoiding extreme temperatures or using a specific type of water. Always verify the recommended boiling duration, as excessive exposure to heat can cause warping or degradation. Additionally, check if any parts of the mouthpiece should not be boiled, such as electronic components or sensitive areas. Manufacturer instructions may also include advice on cooling, shaping, or storage after boiling. Adhering to these guidelines ensures the mouthpiece remains functional, fits correctly, and maintains its intended performance. Proper compliance with manufacturer instructions is critical for both safety and effectiveness.
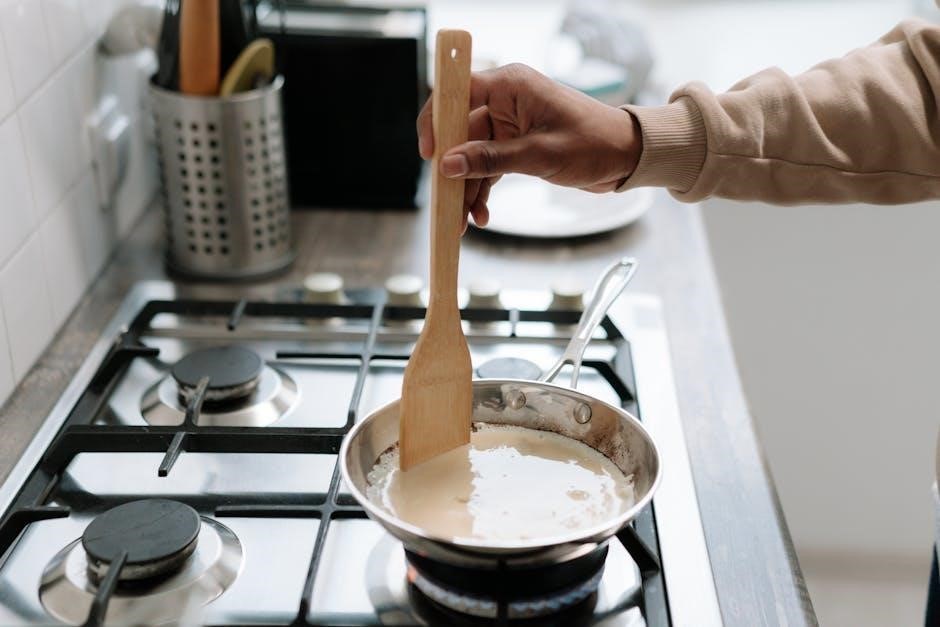
The Boiling Process
Boiling a mouthpiece involves bringing water to a rolling boil and carefully submerging the device. Typical boiling times range from 30 to 60 seconds, depending on the material. Always use tongs or a slotted spoon to handle the mouthpiece safely. Ensure the mouthpiece is fully submerged to achieve proper sterilization and pliability. Never leave the mouthpiece unattended during the boiling process.
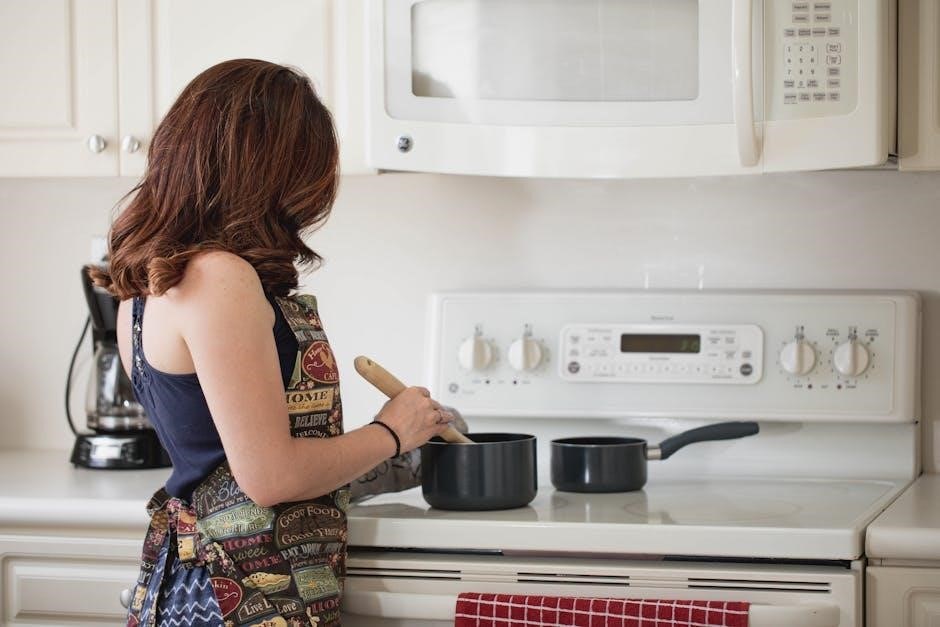
Steps to Bring Water to a Boil
To begin the boiling process, fill a pot with enough water to fully submerge the mouthpiece. Place the pot on a stove and set the burner to high heat. As the water heats, you’ll notice small bubbles forming at the bottom. Once the water reaches a rolling boil, with large, consistent bubbles rising to the surface, reduce the heat slightly to maintain a steady boil. For accuracy, use a thermometer to ensure the water temperature reaches 100°C (212°F). Be careful not to let the water overflow or splash excessively. If using a microwave, heat the water in short intervals, checking until it reaches a boil. Always prioritize safety when handling boiling water to avoid burns or accidents.
Submerging the Mouthpiece Safely
Once the water is boiling, carefully submerge the mouthpiece using tongs or a slotted spoon to avoid direct contact with the hot water. Ensure the mouthpiece is fully underwater for even heating. For most mouthpieces, submerging for 30 to 60 seconds is sufficient, depending on the material. Avoid overcrowding the pot, as this can cause damage or uneven heating. If the mouthpiece has straps or attachments, secure them to prevent movement during submersion. Do not leave the mouthpiece unattended, as overheating can lead to deformation or loss of shape. After submerging, carefully remove it with the same tool to prevent burns or accidental drops. Always prioritize caution when handling hot objects to ensure safety and maintain the integrity of the mouthpiece.
Recommended Boiling Times
The recommended boiling time for a mouthpiece varies depending on its material and purpose. Generally, 30 to 60 seconds is sufficient for most mouthguards to soften and become pliable. For devices with metal parts or straps, boiling times should not exceed 30 seconds to prevent damage. Overheating can cause the mouthpiece to shrink or lose its shape permanently. It’s crucial to follow the manufacturer’s guidelines, as some materials may require shorter boiling times. If no specific instructions are provided, start with 30 seconds and adjust as needed. Always use a timer to ensure accuracy and avoid exceeding the recommended duration. Proper boiling time ensures the mouthpiece is sanitized and ready for shaping without compromising its integrity or functionality. Remember, boiling times may vary, so consult the manufacturer’s instructions for precise guidance.
Removing the Mouthpiece Correctly
After boiling, turn off the heat source and carefully remove the mouthpiece from the water using tongs or a slotted spoon to avoid burns. Avoid splashing the hot water. Once removed, gently shake off excess water and place the mouthpiece on a clean, heat-resistant surface to cool slightly. Do not leave it submerged beyond the recommended boiling time, as this could cause damage. Allow it to cool for a few seconds before handling to prevent burns. If the mouthpiece is too hot, let it cool for about 10-15 seconds. Never use your bare hands to handle it immediately after boiling. Proper removal ensures the mouthpiece retains its shape and remains safe to use. Always prioritize caution when handling hot items to avoid accidents. This step is critical for maintaining the integrity and functionality of the mouthpiece.

Post-Boiling Steps
After boiling, allow the mouthpiece to cool slightly, reshape it while warm, and store it in a clean, dry place to maintain hygiene and fit.
Shaping the Mouthpiece
Once the mouthpiece has cooled slightly but is still warm, carefully remove it from the water using tongs or a slotted spoon. Place the mouthpiece in your mouth and bite down gently but firmly to mold it to your teeth and gums. Hold this position for about 30 seconds to ensure a proper fit. If necessary, use your fingers to press the mouthpiece against your teeth for better shaping. Allow the mouthpiece to cool completely before storing it. For optimal results, rinse the mouthpiece under cold water to speed up the cooling process. Proper shaping ensures comfort, effectiveness, and a secure fit. Always follow the manufacturer’s guidelines for specific shaping instructions to avoid damaging the mouthpiece. This step is crucial for achieving a customized fit tailored to your dental structure.
Cooling Down the Mouthpiece
After boiling and shaping the mouthpiece, it’s essential to cool it down properly to ensure comfort and prevent damage. Once removed from the boiling water, allow the mouthpiece to cool slightly in the air for a few seconds. To speed up the cooling process, rinse it under cold running water or submerge it in an ice bath for about 10-15 seconds. Be careful not to expose the mouthpiece to extreme temperature changes, as this may cause warping or brittleness. Once cooled, gently pat the mouthpiece dry with a clean towel to remove excess moisture. Avoid touching the surface excessively, as oils from your skin may interfere with its fit or performance. Proper cooling ensures the mouthpiece retains its shape and remains comfortable for use. Always handle the mouthpiece with care during this step to avoid accidental bending or stretching.
Proper Storage After Boiling
After boiling and cooling the mouthpiece, proper storage is crucial to maintain its shape, hygiene, and longevity. Store the mouthpiece in a clean, dry place, away from direct sunlight and extreme temperatures; Use a protective case or airtight container to prevent dust, bacteria, or physical damage. Ensure the mouthpiece is completely dry before storage to avoid mold or mildew growth. Avoid storing it in areas with high humidity or near heating vents. For travel or transportation, place the mouthpiece in a sturdy, ventilated container to maintain its form. Regularly inspect the storage container for cleanliness and damage. Always follow the manufacturer’s guidelines for storage, as some materials may require specific conditions. Proper storage ensures the mouthpiece remains hygienic, retains its shape, and stays ready for future use.